![Xelon_Logo_Weiss.png]](https://www.xelon.ch/hs-fs/hubfs/01_Website/00_General_and_design/Logos/Xelon_Logo/Xelon_Logo_Weiss.png?height=40&name=Xelon_Logo_Weiss.png)
Responsibility Matrix
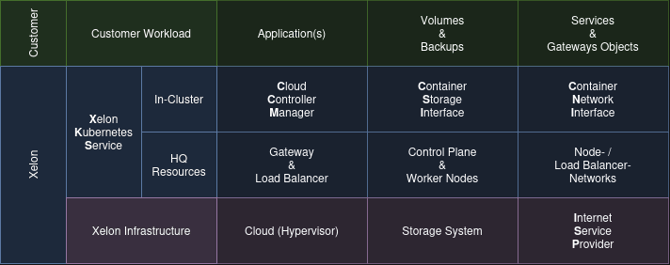
The Xelon Kubernetes Service (XKS) follows a shared responsibility model. Responsibilities are divided across three layers: the customer workload, the Xelon Kubernetes Service itself, and the underlying Xelon infrastructure.
Your workload - managed by you
Everything you deploy into the cluster is under your control and responsibility. This includes applications, persistent volumes and their backups, as well as services and gateway objects. How these resources are operated, updated, and backed up depends entirely on you. We provide the platform capabilities (for example storage classes and load balancing), but we do not manage, monitor, or back up your applications.
Xelon Kubernetes Service - managed by Xelon
Xelon operates and maintains the Kubernetes platform itself. This covers the in-cluster components - the Cloud Controller Manager, the Container Storage Interface, and the Container Network Interface as well as the HQ resources provisioned for each cluster: networks, gateways and load balancers, the control plane, and the worker nodes.
Cluster and node upgrades are provided by Xelon as an automated process: Xelon prepares, tests, and delivers the new versions, and the upgrade itself runs fully automated. However, you decide when an upgrade takes place: upgrades must be triggered by you, so they can be aligned with your own maintenance windows and workload requirements. Security patches and maintenance of the underlying platform components remain our responsibility and are announced in advance where we expect impact on your workload.
Xelon Infrastructure - managed by Xelon
XKS runs on top of the Xelon Infrastructure: the Cloud platform (hypervisor), the storage systems, and the internet connectivity. This layer is operated by Xelon independently of the Kubernetes service. Maintenance on the infrastructure layer is planned, performed, and announced separately from XKS maintenance and follows Xelon's general infrastructure maintenance and notification process.
What do you need to upgrade?
Cluster and node upgrades are prepared and delivered by Xelon, but they don't start on their own - you decide when. This gives you the flexibility to schedule upgrades around your own maintenance windows and workloads.
Starting an upgrade is simple: run it directly from HQ with a single click, fully automated.
Prefer to stay hands-on? Manual upgrades are also possible at any time.
Kubernetes version
If you upgrade Kubernetes to a new patch version, no special considerations are needed, it a low risk upgrade - just go ahead. Nothing does change API wise during those upgrade, to be certain we still recommend reading the Announcement and testing your workload after the change.
Preparations
If you upgrade Kubernetes to a new minor version, you should take a few things into account first:
-
Read the changelog to see what's new and what might affect your workload. For example: https://github.com/kubernetes/kubernetes/blob/master/CHANGELOG/CHANGELOG-1.31.md
-
Check whether your workload is compatible with the new Kubernetes version by consulting your vendors' documentation.
Before the upgrade
Check that your workload is healthy, either through your monitoring solution or with a few simple kubectl commands:
# Deployments & StatefulSets
kubectl get deploy,sts -A --no-headers | awk '{split($3,a,"/"); if(a[1]!=a[2]) print}'
# DaemonSets
kubectl get ds -A --no-headers | awk '$3!=$5 {print}'
These commands check whether the number of desired pods matches the number of running pods.
Also check for any ongoing events that are not "Normal":
kubectl events -A | grep -v Normal
The Upgrade (HQ)
Navigate to your cluster in HQ and click the upgrade button next to your Kubernetes version. Select your desired Kubernetes version and click Upgrade.
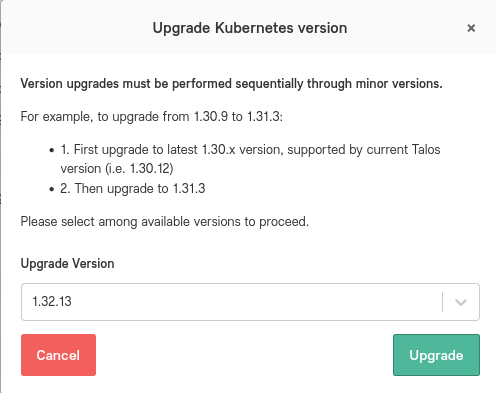
This upgrade does not cause any node reboots - only the Kubernetes API and related components are restarted.
The Upgrade (Manually)
If you would like to perform the upgrade manually, you can do so using talosctl.
To upgrade an individual node, you need to know its internal IP. You can find it with this command:
kubectl get nodes -o wide
We recommend running a dry run first, before performing the actual upgrade:
# Dry run
talosctl --nodes 100.110.255.11 upgrade-k8s --to 1.32.13 --dry-run
# Actual upgrade
talosctl --nodes 100.110.255.11 upgrade-k8s --to 1.32.13
The upgrade only needs to be run against a single control plane node - this node then coordinates the upgrade across the entire cluster.
After the upgrade
To make sure everything was successful, we recommend repeating the same checks as before the upgrade. In addition, manually test your workload to confirm that everything still behaves as expected.
Talos (Node OS)
The operating system on your cluster nodes - Talos Linux - also receives regular updates. Like Kubernetes upgrades, Talos upgrades are prepared and delivered by Xelon, but you decide when to run them.
If you upgrade Talos to a new patch version, no special considerations are needed - just go ahead.
Please consider that an upgrade does reboot the node which restarts the workload on top of this node.
Preparations
If you upgrade Talos to a new minor version, you should take a few things into account first:
-
Read the release notes to see what's new and what might affect your cluster. For example: https://github.com/siderolabs/talos/releases
-
Check the Talos support matrix to confirm that your current Kubernetes version is compatible with the new Talos version: https://www.talos.dev/latest/introduction/support-matrix/
Good to know: If you upgrade through HQ, this compatibility check is done for you - HQ automatically validates that your Kubernetes version is compatible with the new Talos version. The manual check is only needed if you upgrade via talosctl.
Before the upgrade
Unlike a Kubernetes upgrade, a Talos upgrade reboots each node. Nodes are upgraded one at a time, and workloads are moved off a node before it reboots. To avoid downtime, make sure your workloads can tolerate this:
-
Run your applications with multiple replicas, spread across nodes.
-
Configure PodDisruptionBudgets where appropriate, so critical workloads are never fully evicted at once.
-
Assign pod priority classes to your critical workloads. This ensures they are rescheduled first when a node drains - and, if the remaining capacity is temporarily tight during the upgrade, less important pods are preempted in their favor.
Then check that your workload is healthy, using the same commands as before a Kubernetes upgrade:
Check that your workload is healthy, either through your monitoring solution or with a few simple kubectl commands:
# Deployments & StatefulSets
kubectl get deploy,sts -A --no-headers | awk '{split($3,a,"/"); if(a[1]!=a[2]) print}'
# DaemonSets
kubectl get ds -A --no-headers | awk '$3!=$5 {print}'
These commands check whether the number of desired pods matches the number of running pods.
Also check for any ongoing events that are not "Normal":
kubectl events -A | grep -v Normal
The upgrade (HQ)
Navigate to your cluster in HQ and click the upgrade button next to your Talos version. Select your desired Talos version and click Upgrade.
The nodes are upgraded and rebooted one after another, so the cluster as a whole remains available throughout the upgrade.
The upgrade (manual)
If you would like to perform the upgrade manually, you can do so using talosctl. Unlike a Kubernetes upgrade, the Talos upgrade must be run per node. Upgrade one node at a time and wait until it is healthy again before continuing with the next one. We recommend starting with the control plane nodes, followed by the worker nodes.
-
Your nodes run a Talos image built from a specific schematic (which defines the included system extensions). To keep the same configuration after the upgrade, check the schematic ID of your nodes first:
kubectl get nodes -o jsonpath='{range .items[*]}{.metadata.name}{"\t"}{.metadata.annotations.extensions\.talos\.dev/schematic}{"\n"}{end}' -
Use the schematic ID from step 1 to build the installer image URL, and run the upgrade against the node:
talosctl upgrade --nodes 100.110.255.11 --image factory.talos.dev/installer/a28d86375cf9debe952efbcbe8e2886cf0a174b1f4dd733512600a40334977d7:v1.9.5The image follows the pattern factory.talos.dev/installer/<schematic-id>:<talos-version>- replace the schematic ID with the one from your nodes and the version tag with your target Talos version.
Tips:
-
You can also follow the upgrade process live in the Talos dashboard, which shows the node's status, logs, and resource usage in one view:
talosctl --nodes 100.110.255.11 dashboard -
If you temporarily add an additional node to your worker pool, then you can be certain that all workload can be rescheduled and nothing is blocked due to resource constraints.
After the upgrade
To make sure everything was successful, we recommend repeating the same checks as before the upgrade. In addition, manually test your workload to confirm that everything still behaves as expected.
XKS in-cluster components
The in-cluster components (Cloud Controller Manager, Container Storage Interface, and Container Network Interface) are upgraded automatically by Xelon. Whenever you perform a Kubernetes version upgrade, any available component updates are applied as part of the process - no action is needed on your side.
Need help?
If you are uncertain or would like some assistance, feel free to reach out to us at https://support.xelon.ch - we're happy to help.