


This article shows you how to use Rancher UI Driver for Auto Deploying Nodes. Rancher is a management panel (open source) for deploying multiple Kubernetes clusters. Skeleton Rancher UI driver is customized for docker-machine drivers. Driver in Rancher helps you manage which provider can be used to deploy nodes in an infrastructure provider or hosted Kubernetes clusters to allow Rancher to manage and auto-deploy Kubernetes nodes within the designated infrastructure. The Rancher UI driver provides auto-deploying nodes within Xelon HQ.
Rancher UI Driver Setup
First, you need to initiate the Rancher driver on the docker to create an environment for auto-deploying nodes within Xelon HQ. To manage this, you need to:
- Reposit your drive into your account as &nspb;
ui-driver-DRIVERNAME
DRIVERNAME
should be the drive that you need to give to
docker-machine create –driver
- In this case, it should be
Rancher 2 Xelon UI Driver
- Update the assigned “name” in the
package.json
to match.
You also need to update the description, for instance, URLs. - Now install the
Rancher 2 Xelon UI Driver
in the docker using the
npm install
command.
Adding Xelon UI Driver and using the Custom Node Drivers
To use Rancher UI Driver to auto-deploy nodes, you need to deploy the driver using the provider to initiate the driver’s use. Then you can create the node templates and the overall node pools where they will be auto-deployed within Xelon HQ.
- From the Global view, choose Tools>Drivers located in the navigation bar. For the Drivers page, select Node Driver.
- Then click “add Node Driver”.
- After completing the Driver’s page, add the Node Driver form and click Create.
| Key | Value |
| Download URL | https://github.com/Xelon-AG/docker-machine-driver-xelon/releases/download/v1.0.1/docker-machine-driver-xelon_linux_amd64 |
| Custom UI URL | https://vdcstatic.xelon.ch/files/component.js |
| Whitelist Domains | vdcstatic.xelon.ch |
| Key – Value Overview Table |
- Wait for the designated driver to become “Active.”
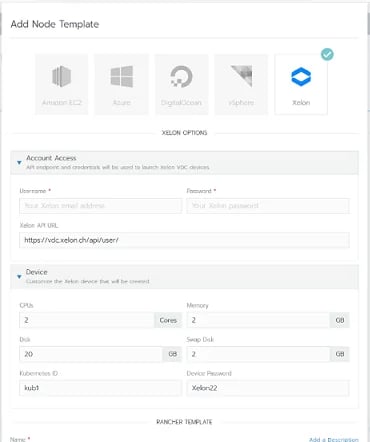
- Add a Machine Driver in Rancher 2.0 (Global -> Node Drivers)
- Download URL: The URL for the driver binary
&nsbp;
e.g. https://github.com/mycompany/docker-machine-mycompany/releases/download/v1.0.0/docker-machine-driver-mycompany-v1.0.0-linux-amd64.tar.gz) - Custom UI URL: The URL you uploaded the dist folder to
&nsbp;
e.g. https://github.com/mycompany/ui-driver-mycompany/releases/download/v1.0.0/component.js)
- Wait for the driver to become “Active.“
- Go to Clusters -> Add Cluster, your driver and custom UI should show up.
Development of Rancher UI
Rancher 2 Xelon UI Driver
at http://localhost:3000/component.js. You opt to run this small website while pointing and developing the Rancher settings there.
- npm start
- The driver name can be discretionary overwritten:
npm start -- --name=DRIVERNAME
- The compiled files can be viewed at http://localhost:3000.
Note: When the developed server is changed, the nodes don’t automatically restart. This means you need to point the driver to a new node. This can help the drivers deploy automatically from the developed files in the development server.
When deploying, don’t use the model
—<drivername<Confg
signature to access your
Rancher 2 Xelon UI Driver
config within the template file. Just use the config setup alias, which is already located in the component.
Building of Rancher UI Driver
For auto-deployment of the
Rancher 2 Xelon UI Driver
, you need to make your driver available by building and hosting its output on a server that is not only accessible but open to their browsers.
To build the
Rancher 2 Xelon UI Drive
you need to:
- run the npm run build command in the docker.
- Paste the contents of the
dist
directory in a webserver.
Note that if your rancher driver is configured using SSL and HA, the server must be configured and available in HTTPS.
Release Process of Rancher UI Driver
The release process uses continuous integration from CircelCI. This means the code base should release at any time.
Checklist for releasing Xelon UI Driver
The below steps are for final release:
- Check that the latest build compiles and passes tests.
- Trigger release creation by tagging git commit with
- # X.Y.Z. is a release version, e.g. 1.2.0
- $ git tag -a vX.Y.Z -m “Release vX.Y.Z.”
- Wait for the build to finish and release created.
- Update release information if needed.
Reference
- https://rancher.com/docs/rancher/v2.x/en/admin-settings/drivers/node-drivers/
- https://github.com/rancher/ui-driver-skel
- https://kubernetes.io/docs/tasks/tools/install-kubectl-windows/
- https://www.digitalocean.com/community/tutorials/how-to-set-up-multi-node-deployments-with-rancher-2-1-kubernetes-and-docker-machine-on-ubuntu-18-04
If you have any question how to use Rancher UI Driver for Auto Deploying Nodes please feel free to contact our support team!
What are your Feelings:
Feel free to Share this Article:

Leave a Reply
Your email address will not be published. Required fields are marked *