


This article shows you how to setup a Kubernetes Cluster with Load Balancer and Firewall in Xelon HQ. Kubernetes or k8s is basically an open-source container-orchestration system for automating all the server components including provisioning of the networks and making applications auto scalable, based on set metrics. There are different ways to do that, in this article we will setup a Kubernetes Cluster on the Platform Xelon HQ.
Setup a Kubernetes Cluster
First of all, create an account to Xelon HQ or login to your current Account. If you don’t have an Account so far, you can register for free here.
Steps to setup a new Kubernetes cluster in Xelon HQ
- Login to the account https://vdc.xelon.ch
- Under the URL: https://vdc.xelon.ch/kubernetes you’ll find the list of all currently configured Kubernetes Clusters:
3. To create a new cluster, please click on “Create Kubernetes Cluster”
4. The wizards starts now with some basic information you have to define.
- Cluster Name: Any user-defined cluster name can be chosen here.
- Select Tenant: It’s the name of the organization to which the user account is associated.
- Select Cloud: Choose between Public or Private cloud.
- Kubernetes Version: This is pre-filled, the currently supported version is 1.17.x
5. Further nodes and pools can be configured based on the web application that will be used. Usually for running any k8s cluster we suggest a minimum of 3 nodes. One cluster will operate as the master node and the other 2 are worker nodes.
6. Accordingly, the CPU cores, disk size (HDD/SDD) and RAM can be chosen: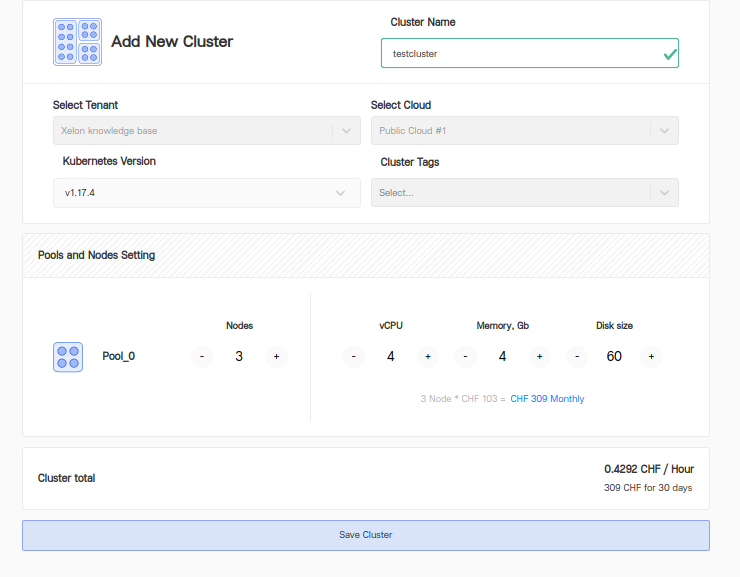
7. To complete the wizard, please click “Save Cluster”
After few mins the cluster will be successfully created and deployed on Xelon HQ.
How to connect to cluster via command line on any linux machine
Prerequisites :
Kubectl
To start please download the cluster config file and replace it with the your own saved path in below commands. To show the nodes and cluster information, please use the commands below:
kubectl --kubeconfig=~/config-741d40707520.yaml get-nodes kubectl --kubeconfig=~/.kube/config-741d40707520.yaml cluster-info
Configure a Network in Xelon HQ
This article has multiple configurations included. First we will take care about the firewall configuration and second we will take care of the load balancer service.
Once you click on “All Networks” you can see the list of all currently configured networks. Alternatively you can also use the direct URL: https://vdc.xelon.ch/networking.
- To create a new network, please click on “Create Network”.
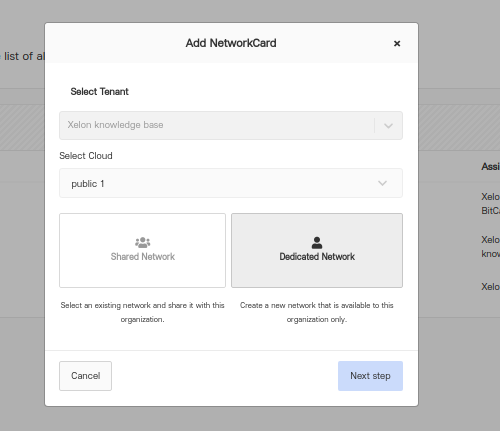
- You can choose either creating a Shared Network or a Dedicated Network.
The shared network means that the parent organization can share the existing network with the child organization. - After you clicked on Next Step, you can choose if you network should be LAN or WAN.
WAN
External IP addresses will be exposed publicly and the internal resources can be reached directly.
LAN
Internal Network with private IP addresses which are assigned to each of the devices you create. For example, any web app hosted on CentOS machine usually has a private LAN IP address.
DMZ
DMZ is short for a demilitarized zone. This is a network (physical or logical) used to connect hosts that provide an interface to an untrusted external network – usually the internet.
In this case we decide for a WAN network: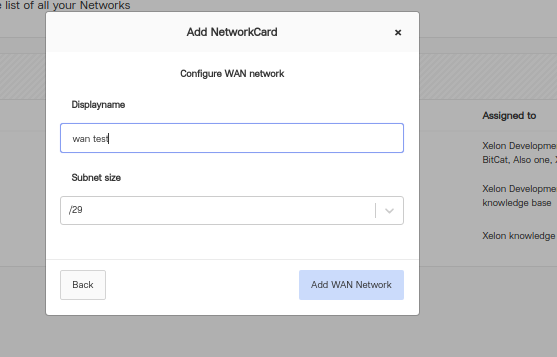
4. Click on Add WAN to finish the wizard.
On the same way, you can also add LAN or DMZ. Usually you need a firewall in front of your infrastructure to restrict internal and external traffic. So any external traffic can be restricted on 5 tuples methods:
- Source IP
- Destination IP
- Source Port
- Target Port
- Protocol (usually TCP, UDP or both)
To proceed on our way to configure Kubernetes Cluster with Load Balancer and Firewall, we now go on with the firewall first!
Configure a Firewall in Xelon HQ
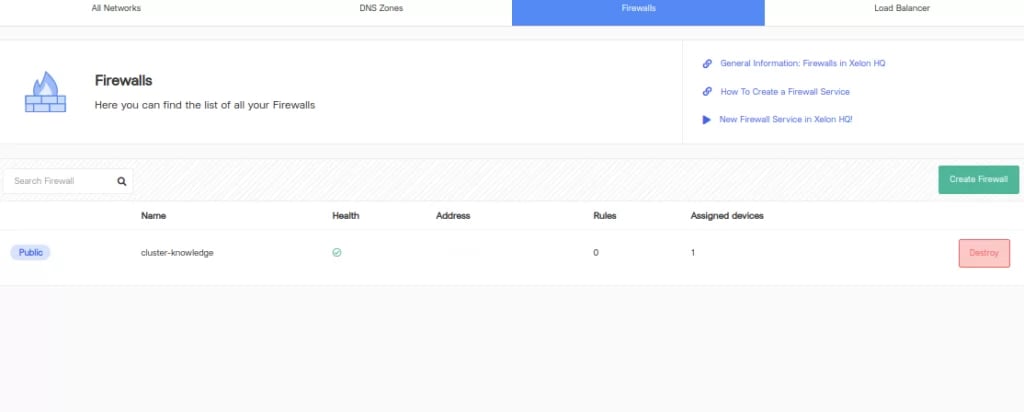
For listing created firewalls or adding new firewall please click in Xelon HQ on Firewalls or visit https://vdc.xelon.ch/networking/firewall.
- To add a new firewall please click on Add a new Firewall.
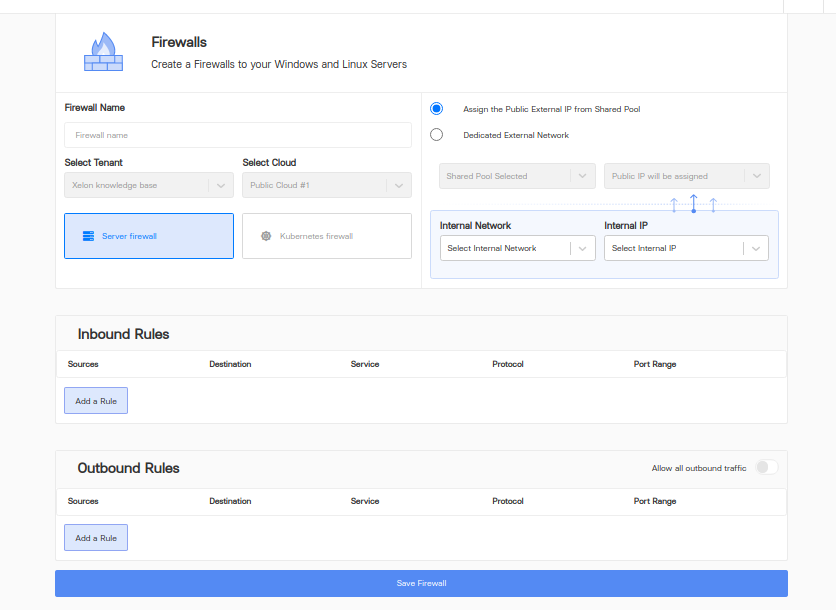 As you see on the picture, you are now able to fill in all your specific informations regarding your new firewall.
 - Please add a firewall name.
- Please choose Kubernetes Firewall to apply the firewall to your K8s cluster. For applying to any other windows/mac/linux servers, the server firewall option can be chosen.
- Choose external and internal networks to which the firewall inbound/outbound rules will be applicable. So in case a user wants to protect any publicly exposed rest API service or web app, the inbound rule can be chosen.
Example shown in the image here: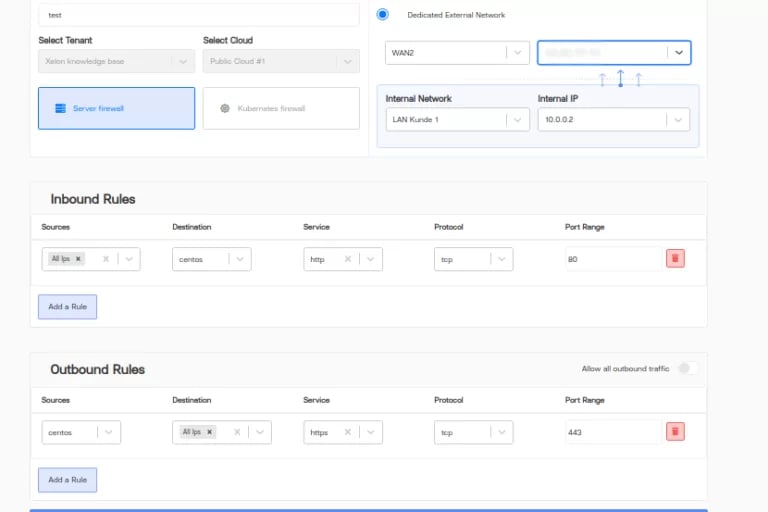
In the above rule, we are allowing any HTTP traffic from any source ip address to the an internal app.
At the same time we are allowing any HTTPS traffic to go outside without any restrictions.
Note: Here CentOS machine is the Linux server on which inbound and outbound rules are applied. - Click save firewall and you are done.
Explanation Kubernetes Cluster Firewall
Example: Lets say you have a web app which is Laravel based including NGINX in front of it and consider that we are using k8s cluster firewall. In such a case we want to allow HTTP/HTTPS traffic from all the source IPs and target them to the web app port. So the flow will be k8s cluster to node (usually more than 2) to pods to Laravel container images. We use port 9000 for Laravel, port 8080 for NGINX and port 3306 for MySQL. The Laravel container will listen on port 9000.
So based on the above use case, we apply the firewall on any of the multiple nodes of the specific cluster chosen and have 2 inbound rules to allow HTTP/HTTPS 80/443 traffic to be internally translated to 8080 on which NGINX service is running. From NGINX configuration, the traffic is further routed internally to our Laravel app and port 9000.
The server firewall works similarly. The only difference is that we don’t have a k8s cluster, and we apply rules directly to the public server having external IPs.
So now the traffic goes as:
External IP → Internal network → Source port → Destination
(Machines may be Laravel in this case). In case of using a server firewall, the destination is usually the virtual machine or any such device with OS installed.
In case of Kubernetes firewall, the destination is one of the nodes that are configured while creating new cluster above.
The last part of our article how to configure Kubernetes Cluster with Load Balancer and Firewall, we proceed with the load balancer.
Configure a Load Balancer in Xelon HQ
There are two types of load balancer. On one hand we have network level load balancer and on the other we have application level load balancer.
Also in the k8s cluster we do have ingress traffic and external traffic load balancers.
External load balancer balances the traffic across multiple services configured in k8s cluster.
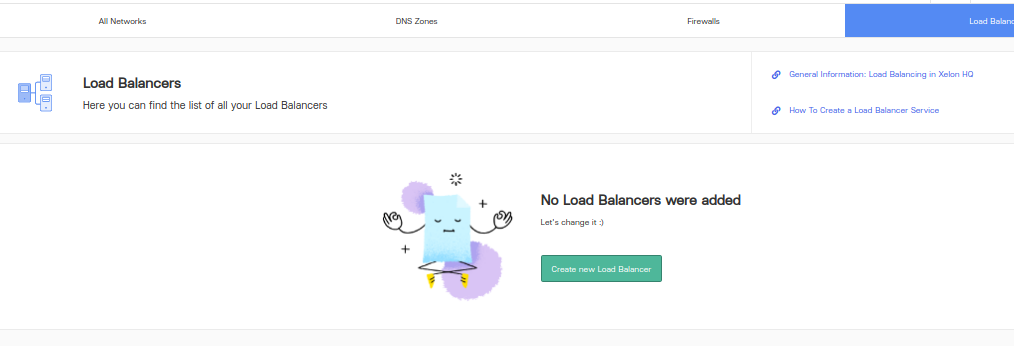
- Click create load balancer or visit the URL https://vdc.xelon.ch/networking/load-balancer/add-load-balancer
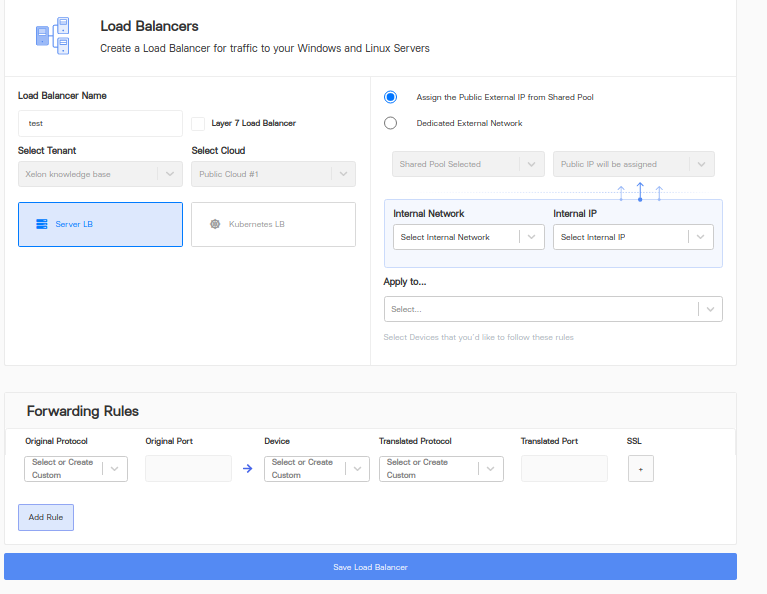
- Name can be any user-friendly name
- Here the load balancer can be configured at k8s cluster level or server level similar to firewall options.
For applying to server we further have 2 ways:
- One way would be to configure layer 7 that is using HTTP/HTTPS protocols or applying load balancing rules to any such web URL
Example: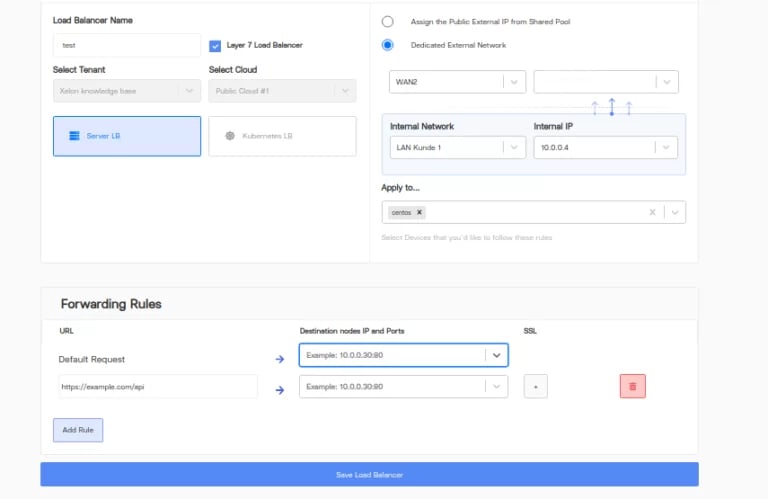
The above rules load balances traffic coming to the web URL https://example.com/api among the 2 destination nodes for which the IP address can be added as shown in the image. - The other way would be to use a network server load balancer(uncheck the layer 7 checkbox). This usually works on protocol level and requires port and IP addresses.
As shown below, the 80 port traffic is forwarded to HTTPS 443 port on CentOS Linux machine.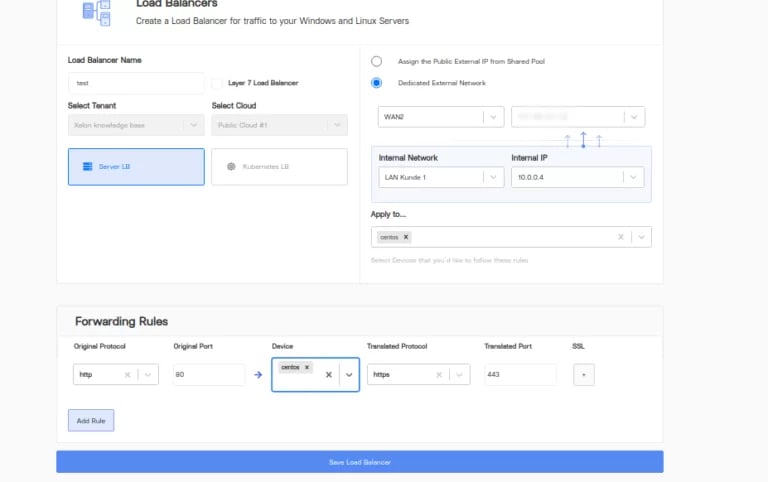
For applying load balancer at k8s cluster: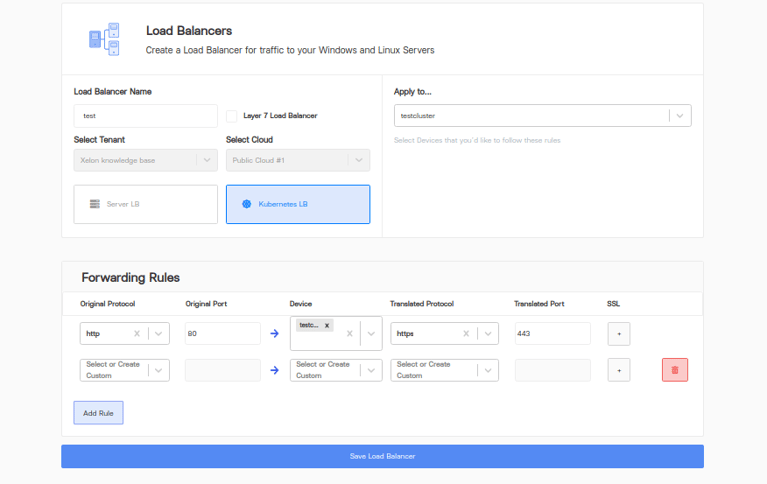 Forwarding rule above tells to forward all incoming HTTP traffic to HTTPS port which is 443 .
So basically a simple use case of HTTP → HTTPS redirection.
The rule above can be applied to any dropdown list of cluster names (Apply to…in image).
Click save load balancer and you are done.
Explanation Load Balancing
The most powerful way to have k8s load balancer configured is to use ingress controller service. Ingress is the load-balancing method of choice. Since it is essentially internal to Kubernetes, operating as a pod-based controller, it is widely used at enterprise level.
For k8s cluster we usually have below ingress rules created for load balancing The sample YAML file for the same.
apiVersion: networking.k8s.io/v1
kind: Ingress
metadata:
name: minimal-ingress
annotations:
nginx.ingress.kubernetes.io/rewrite-target: /
spec:
rules:
- http:
paths:
- path: /testpath
pathType: Prefix
backend:
service:
name: laravel
port:
number: 9000
So internally the ingress load balancers work as: k8s → traffic > ingress → one of the 3 services → pod → Laravel images.
Now coming back to our Xelon dashboard, we can have either one or multiple devices on which forwarding rules can be applied.
- In case of server LB, the destination is usually the vm machine or any such device with OS installed.
- When using Kubernetes LB, the destination is one or multiple nodes that are configured while creating a new cluster.
- If the load balancer port mapping is done internally and HTTP/HTTPS traffic is translated.
If you still have any question How to setup a Kubernetes Cluster with Load Balancer and Firewall please let us know! Contact our DevOps free of charge!
What are your Feelings:
Feel free to Share this Article:

Leave a Reply
Your email address will not be published. Required fields are marked *